Quick Asian Style Shrimp Saute

Chinese Shrimp with Cucumber

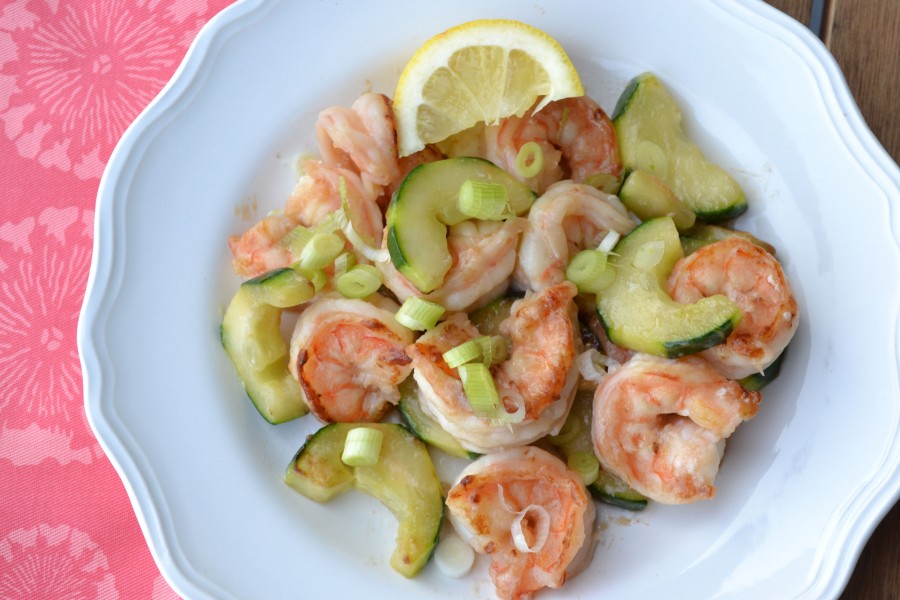
Shrimp is always a tasty treat in the summertime. Put it together with refreshing cucumber and you have a light, very quick dish. I guarantee you can make this dish at least twice in the time it takes for that Chinese delivery guy to show up. But this will be much fresher.

Chinese food has actually been in America since the late 1800’s and it made it’s way to the east coast early in the 20th century. When “The Art of Good Cooking” was written in the 1960’s, Polynesian themed restaurants were gaining popularity. Surprisingly, American Chinese food is actually a strange combination of Cantonese, Polynesian, and American cuisine. This is reflected in the sweeter ingredients like sugar and pineapple, as well as the infamous MSG that was practically considered a spice in the 1960’s. This dish is no exception and was titled “Shrimp with Cucumber, Chinese Style.” It of course includes cornstarch, sugar, and sherry (optional) which are all definitely not Authentic Chinese ingredients, but more so American Chinese ingredients (which also means kids will love it!).

Ingredients:

4 tablespoons sherry (optional)
2 tablespoons soy sauce
½ teaspoon sugar
2 tablespoons cornstarch
2 lbs shelled, cleaned raw shrimp
2 large cucumbers
2 tablespoons vegetable oil

Combine sherry (if using), soy sauce, sugar, and cornstarch. Marinate shrimp in this mixture. Peel cucumbers and cut in half; scoop out seeds with a teaspoon. Cut into ¼ inch slices. Add to shrimp mixture.

Just before serving, drain shrimp and cucumbers from marinade but reserve marinade. In a heavy skillet, heat vegetable oil until it is hot. Add shrimp and cucumbers. Saute over high heat stirring constantly, for 3 or 4 minutes, or until all shrimp are pink. Add marinade. As soon as sauce thickens, serve with fluffy steamed rice. Garnish with chopped scallions.

Serves 5-6.

Yum

Tricolor Potato Salad

Multicolor Potato Salad

In the interest of the hot summer days ahead, I’m continuing my testing of easy classic salads. The simplicity of some of the salad recipes in “The Art of Good Cooking” is refreshing. The base of this potato salad recipe, for example, has just five ingredients (not including the dressing). To change it up a little, I added kalamata olives and used tricolor baby potatoes. You’ll find these bite size potatoes sold in mesh bags which usually include purple “Peruvian” potatoes (who’s skin, I found, falls off easily after cooking), red potatoes, and white potatoes- similar to fingerlings. You could, of course, use all one type of potato, but what’s the fun in that?

Potato salad has somewhat of a lengthy history that’s intertwined with the long and overwhelming history of the potato, of course. As a basic salad that includes potatoes and some kind of dressing, many different countries (mostly European) have their own versions. Though I haven’t been able to find any official documentation, it seems German potato salad was one of the first (or the first) potato salads to make it to the US. Interestingly, my grandmother mentions in her notes for this recipe that German potato salad normally contains mayo, but that this vinaigrette version was preferred by her family. I always thought the opposite: that German potato salad never had mayo and always had some type of vinaigrette. After a little research, it appears that different parts of Germany have different “traditional” German potato salads. Some are creamier and often contain mayo, while others do not.

I included two sets of instructions below: the original and modified. Since I often don’t want the extra heat from the oven in the summertime (and prefer a quicker version), I like to simply cook the potatoes and dress them. The original recipe requires cooking and then baking them. Both methods are delicious. Since potatoes hold up well to seasoning and salt, kalamata olives are a welcome contrast in both texture and flavor. Pack this one away for your next party in the park and happy picnicking.

Ingredients

2 lbs tricolor baby creamer potatoes
1/2 cup vegetable or chicken stock
1/4 cup olive oil (2/3 cups for the baking version)
4 tablespoons red wine vinegar
salt and pepper
1 onion, minced
1 small green pepper, minced
1/3 cup parsley
3/4 cup pitted kalamata olives

Modified Quick Cooking Version
Wash potatoes; place in a deep pot. Cover potatoes with water and stock. Bring to a boil, then lower heat and simmer until potatoes are tender when pierced with a fork. Drain and cool until they can be easily handled. Peel the purple potatoes. Cut all potatoes in quarters.

Whisk together oil and vinegar until emulsified. Add vinaigrette to warm potatoes and refrigerate until cold.

Add olives, minced onion, green pepper, and chopped parsley.

Original Version
Wash potatoes; place in a deep pot. Cover potatoes with water and bring to a boil. Lower heat and simmer until potatoes are tender when pierced with a fork. Drain, cool, and refrigerate until they are cold. Peel the purple potatoes. Slice all potatoes and place in an oven-proof dish.

Add chicken stock, olive oil and vinegar, and season with salt and pepper. Place in a 350 degree oven for 1/2 hour, or until the potatoes are hot and liquid is simmering. Remove potatoes from oven and allow them to stand until lukewarm.

Add olives, minced onion, green pepper, and chopped parsley. Chill and serve.

Serves 6

Adapted from “The Art of Good Cooking” by Paula Peck.

Yum

Stuffed Squid

Crab Stuffed Squid

I know what your thinking about this photo. What are those awkward tubular things with pale centers speckled with green. Are they giant croquettes? No…it’s a seafood delight: whole squid stuffed with a crab shrimp combination smothered in a tomato wine sauce. If you’re a seafood lover than this dish is for you.

I made very few changes to this Italian based dish from “The Art of Good Cooking.” Primarily, I just eliminated the beef gravy because it’s often too time consuming to make and using a canned gravy with fresh seafood seems like a waste. As with all seafood, the two most important elements for success are: 1. To use the freshest seafood 2. Not to over cook any of it, especially the squid. If you manage these two tasks, you’ll end up with a soft buttery mix of lump crab meat and tender shrimp surrounded by light fresh squid with just the slightest bite. Save this one for a special occasion.

Ingredients:

6 medium-size squid
1 onion, chopped
6 cloves garlic, minced
1/4 cup melted butter
1/2 cup chopped parsley
1 teaspoon tarragon
1 1/2 cups finely chopped cooked shrimp
1 1/2 cups finely chopped cooked crabmeat
salt and pepper
1/2 cup scallions
1 cup tomato puree
1/2 cup red wine
Saute chopped onion and half of the minced garlic in half melted butter. When vegetables are soft, add chopped parsley, tarragon, shrimp, and crabmeat. Toss well together. Season well with salt and pepper.

Stuff this filling firmly into the cleaned squid tubes. Heat remaining butter in saucepan. Add chopped scallions and remaining garlic. Saute till tender. Add tomato puree and wine. Bring to a boil and simmer for 5 minutes. Lower heat. Add stuffed squid and simmer until squid are tender, about  20-30 minutes. Garnish with chopped parsley.

Serves 6.

Yum

Strawberry Rhubarb Pie

Strawberry Rhubarb Pie Slice

Similar to strawberries or asparagus, rhubarb has always been a common spring staple for me. Growing up, we had a rhubarb plant amongst a strip of overgrown bright orange flowers (daylilies?) along our driveway. Though its size changed over the years, it never failed to produce. I remember checking the stalks to see if they were long or thick enough to use, and at least once or twice a year my mother would make strawberry rhubarb cobbler, or sort of a cross between a cobbler and a pie because she couldn’t be bothered with pie dough. This combination has since been a nostalgic favorite of mine and I’m a big fan of this tart fruity celery-like vegetable. You definitely can’t sit around munching on it but I always felt it was an underused fruit on the east coast.

This pie was actually adapted from the rhubarb tart recipe in “The Art of Fine Baking.” By changing from a flan mold to a pie plate and the addition of strawberries, it morphed into a whole new dessert that’s fairly different from its original precise tart parent. Rhubarb and strawberries are just too good to separate.

Other than distinctly tasting both the strawberry and the rhubarb instead of jellylike globs, there are 2 things that make this pie different (and more delicious) than many other strawberry rhubarb pies. Both involve the crust:
1. A layer of ground nuts is spread across the bottom of the pie crust before the filling is added.
2. lemon zest is added to the pie dough
The nuts are a great idea from the original recipe. Not only does it add a toasted nutty flavor but it helps soak up some of the juice from the strawberries and rhubarb without making it soggy. The Lemon zest brightens the taste of the crust and compliments the freshness of the fruit. It’s pleasantly surprising what a difference these small additions make.
If your looking for a replacement for that apple pie whose season ended months ago, this sweet and sour pie will get you ready for the fruits of summer…

3 cups rhubarb, cut in 1 inch pieces
3 cups strawberries, hulled and sliced
4 tablespoons cinnamon sugar
1 cup sugar
1 teaspoon orange zest
3 tablespoons flour
2-3 tablespoons cornstarch
1 beaten egg mixed with
1 tablespoon milk
1 cup ground walnuts, pecans, or hazelnuts
1 recipe rich tart pastry

Grease a 9 inch pie plate and preheat oven to 350 degrees. Roll out pastry on a floured surface until 1/8 of an inch thick. Line pie plate with pastry. Save trimmings for top of pie. Chill.

Press ground nuts into the bottom of pie shell. Mix together, rhubarb, strawberries, sugar, cinnamon sugar, zest, flour, cornstarch. Fill pie shell.

Roll out remaining pastry dough. Brush with egg milk mixture and cut into strips the length of the top of the pie. Layer lattice pastry strips on pie.

Bake 45 minutes to 1 hour or until juices are bubbling and the top is lightly browned.

Yum

Classic Chicken Salad

Chicken Salad

As one of those American picnic salad staples like egg salad, coleslaw, or macaroni salad, chicken salad is often considered a little boring with its mayo base. Though happily sandwiched between lettuce and two slices if bread, a good chicken salad can easily stand on its own. This recipe comes from what I consider a good base recipe in “The Art of Good Cooking.” It benefits from small additions and changes to make it homier, interesting, and less institutional.

As recommended in the original recipe, I made the mayo base from scratch which gives it a much richer flavor. Red grapes provide the sweet contrast between each bite and the sliced almonds fulfill the craving for a nutty crunch. I also added celery and scallions for a crisp freshness. Simple and perfect for a spring picnic or on-the-go lunch, this is a mayo based chicken salad that doesn’t go out of style.

Note: If using store bought mayo, add about 1 teaspoon of lemon juice. The acidity helps balance the fat and richness of the mayo and chicken.

Ingredients:

8 chicken breast halves, skin on bone in
chicken stock
1 cup chopped celery
3/4 cup sliced almonds, toasted
1 cup seedless grapes, halved
1 teaspoon chopped fresh tarragon
2 scallions, chopped
2 tablespoons chopped parsley (optional)
1 cup diced boiled ham (optional)
salt and freshly ground pepper
1 cup homemade mayonnaise

Place chicken breasts in a low, wide saucepan. Add enough well seasoned stock just to cover the chicken. Bring to a boil. Lower heat and simmer breasts for just 8 minutes. Remove chicken from stock.

When chicken is cool enough to handle, pull off skin and pull the meat away from the bones. Cut the chicken into 3/4 inch chunks. Place them in a bowl.

Add ham (if using), celery, almonds, grapes, tarragon, scallions, parsley (if using), salt and pepper. Add mayonnaise and toss lightly. Taste and correct seasoning.

Serves 8

Adapted from “The Art of Good Cooking”

Yum

1 26 27 28 29 30 34