Deviled Clams

Deviled Clams

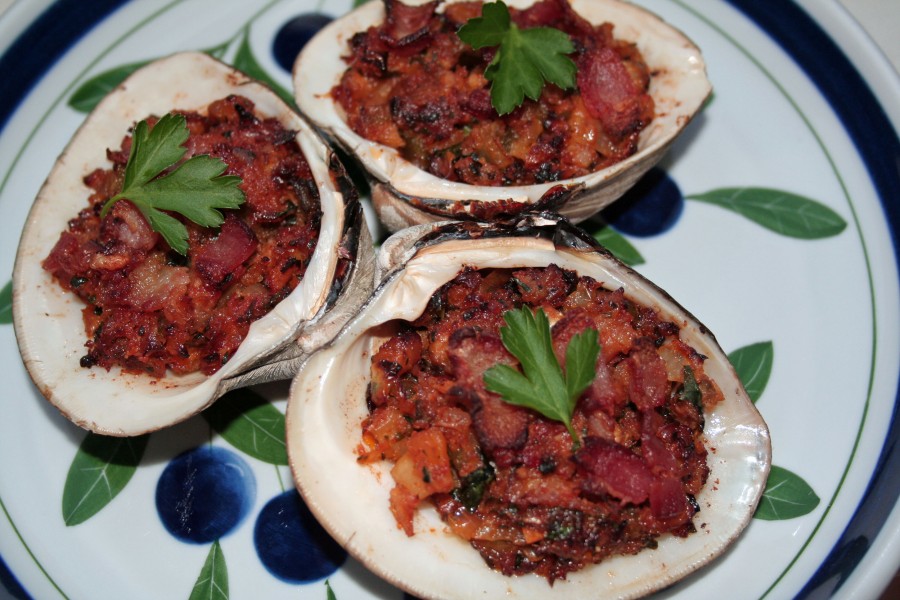
I must admit that these tasty little fruits of the sea came out a little crispier and a little darker than I intended. I blame it on a new oven fiasco. While the recipe says to broil on medium, today’s ovens usually offer just low and high broil settings. In the interest of time, I decided to use the high setting and promised myself I would watch them carefully. Unfortunately, I was using a brand new oven and the broil setting hadn’t yet been used. Not only did the oven omit a strong new oven/chemical smell on the high broil setting, the neighbors called security due to what they said smelled like “an electric fire. Somehow amongst the commotion of the multiple security guards and maintenance men entering our apartment to stare at inspect the new oven, one of whom felt the need to comment that he was looking at buying the same oven for his own apartment, I managed to broil these little guys without completely destroying them. I actually enjoyed the combination of the slightly crispier top with the soft filling. The small piece of bacon on top, while delicious (of course), almost overpowers the light fresh clam flavor and could be easily omitted. These little bursts of flavor are an excellent appetizer or light lunch (especially if your broiler works properly…).

Ingredients:

2 dozen small (cherrystone) clams or 1 dozen large
1 cup dry white wine
1/4 cup unsalted butter
1 small green pepper, finely chopped
1 onion, finely chopped
2 cloves garlic, finely minced
1/2 cup chopped parsley
1/2 cup soft bread crumbs
2 teaspoons tomato paste
salt and pepper
dash of cayenne pepper
2 slices bacon, chopped

Scrub clams well to get any sand off shells. Place them in a large pot and add wine. Cook, covered, over low heat, just until the clam shells open.

Remove clams from pot and reserve half of each shell. Remove clams from shells.

Grind clams in food processor.

Melt butter in skillet. Saute green pepper, onion, and garlic till soft and golden. Add chopped parsley and bread crumbs. Stir in tomato paste. Season well with salt, pepper, and cayenne pepper. Remove from heat and add clams.

Fill reserved clam shells with this mixture. Sprinkle tops with chopped bacon (if using) and place on broiling pan.

Brown under low broil (or high broil if watched carefully) until bacon is crisp.

Serves 4

From “The Art of Good Cooking” by Paula Peck. Adapted by Megan Peck.

Yum

Strawberry Kiwiberry Mascarpone Cream Parfait

Strawberry Kiwiberry Marscarpone Parfait

Yes, it’s as delicious as it looks. It is also very easy to make and a crowd pleaser. I used kiwiberries because I like their combination of tart skin with the sweet flesh but regular chopped kiwi, banana, raspberries, blueberries, or any combination of fruit all work well here.
If you’re a kiwi lover but not familiar with kiwiberries, you should be. These miniature kiwis with fuzz free tart edible skin, may seem like baby kiwis but they are actually an entirely different fruit. Often from New Zealand, Kiwiberries or Hardy Kiwis can be difficult to come by and expensive. Here in NYC, they’re available at most gourmet food stores and according to Wikipedia (Kiwiberries on Wikipedia), more commercial production is now taking place in the U.S. so this “historically unsuccessful fruit” may become more available. If you’re a fan of sweet and sour combinations like I am, you should definitely try kiwiberries.

You may be wondering if or how this recipe relates to Paula Peck and her cookbooks. Well, the recipe itself may not (no kiwiberries in the 1960’s, that’s for sure) but the inherent pound cake recipe comes directly from “The Art of Fine Baking.” I also think she would love the beauty and simplicity of this recipe, though she would probably add cognac or kirsch to the cream layers.

Ingredients:

1/2 pound strawberries, hulled and sliced
1 – 6oz package kiwiberries, sliced
1/2 loaf Basic Pound Cake (recipe follows), sliced and cut into 1-2 inch pieces
1 cup heavy whipping cream
3-4 tablespoons powdered sugar
3 tablespoons mascarpone cheese
1 teaspoon vanilla extract

Beat heavy cream until soft peaks form. Add vanilla and 1 tablespoon powdered sugar. Continue beating, gradually adding remaining sugar, until the cream holds stiff peaks. Beat in mascarpone cheese.

To build the parfaits: in clear dessert glasses, begin layering cake, cream, and fruit. Cover the bottom of the glass with 1-2 pieces of cake followed by a few dollops of cream. Build a ring of kiwiberries around the glass by sliding them down the side (cut side out). Add strawberries. Continue layering and top with cream and strawberries.

Serves 4-6.

Basic Pound Cake

Ingredients:

3 eggs
1/2 cup sugar
1/2 cup butter
1 cup sifted flour
1 teaspoon vanilla extract

Preheat oven to 350 degrees. Grease a loaf pan and dust with flour.

In a large bow, combine eggs and sugar. Beat for a minute. Set bowl over saucepan of hot water. Place saucepan over low heat for about 10 minutes, or until eggs are slightly warmer than lukewarm. Do not let water boil. Stir eggs occasionally while they are being heated to prevent them from cooking on bottom of bowl.

While eggs are warming, cream butter and flour till light and fluffy. Add vanilla.

When eggs are lukewarm, beat them until cool, thick, and tripled in bulk. Quickly stir 1/4 of beaten eggs into creamed mixture. Pour mixture over remaining beaten eggs. Fold in gently. Be careful not to over mix.

Pour batter into prepared pan. Bake about 40-50 minutes or until cake is golden brown and pulls away from the sides of pan.

Yum

Cheesy Bean Burger Blasters

Cheesey Bean Burger Blasters

Since I was curious about making homemade refried beans and Paula Peck’s Mexican/Tex-Mex style recipes are almost always excellent and reliable (she spent time cooking in Mexico- more about that later), I decided to try this gem of a recipe for Refried Bean Cakes that is tucked away in the vegetable section of “The Art of Good Cooking.”

A friend mentioned that the name didn’t do these tasty little patties justice. Like myself, she couldn’t get over how flavorful the homemade refried beans were by themselves, especially with so few ingredients. I kept saying she had to try them and her response was something like “homemade refried beans? Um…ok…interesting.” After tasting them, this quickly turned to “wow, i could just sit and eat a whole bowl of that stuff by itself.” Maybe the name Cheesy Bean Burger Blasters isn’t that much better but it’s at least interesting and fun to try to say five times fast.

Simplicity is key here and these are not to be confused with canned refried beans or the soupy mess that comes with your enchiladas at your neighborhood Mexican restaurant. When turned into a patty with melted ooey gooey cheese in the center, it’s just a rich amazing mess of deliciousness.

Ingredients:

1 recipe Homemade Refried Beans
1/2 cup grated Parmesan cheese
3/4 cup finely chopped onion
6 pieces Jack, Mozzarella, or melting cheese of your choice, each 1″ x 1″ x 1/2″
3/4 dry bread crumbs
oil or butter for sauteing

Add grated cheese and chopped onion to refried beans and refrigerate until cold. Divide mixture into six parts. Shape each part into a patty, pushing a piece of cheese into the center of each. Roll each bean cake in dry bread crumbs, then refrigerate one hour or more.

Heat 3 tablespoons oil or butter in a large skillet. Saute bean cakes, turning to brown on both sides and heat through.

Note: for firmer cakes that are less fragile, use a traditional breading method: dip cakes in flour, then beaten egg, and finally roll in breadcrumbs.

Serves 6

Yum

Fried Calamari with Two Dipping Sauces: Marinara and Aioli

I love all things seafood. Maybe it’s my upbringing in the landlocked Midwest and therefore lack of fresh seafood or that I was fed pureed sushi as a baby, or maybe its just my appreciation for it from a culinary standpoint. Whatever it is, you will see a few more Paula Peck seafood recipes on here soon. I had to modify this one quite a bit from the original in “The Art of Good Cooking.” The flour liquid proportions were pretty far off and had to be corrected. I also prefer to use a beer batter for both texture and flavor. This is not the breaded style fried calamari often served as bar food, but more of a tempura style. Though perfectly delicious on it’s own with a squeeze of lemon as noted in the original recipe, I like to take it a step further with a couple different dipping sauces: a simple marinara and a lemon aioli. The aioli is my favorite. I’ll eat it with just about anything fried, especially french fries. You can buy mayo and add lemon and garlic to make the aioli, but I really think it tastes much better homemade. This lemony garlicky sauce is the perfect complement to any seafood, especially this crunchy yet soft calamari. So enjoy this favorite bar food with an ice cold glass of beer at your next casual get together. Cheers!

Ingredients:

1 pound small squid
vegetable oil for frying
1 1/2 cups sifted flour
1 teaspoon baking powder
1 teaspoon salt
2 cups beer
1 lemon cut in wedges

Clean squid by washing under running water, rubbing off any outer speckled skin and pulling out all entrails. The fish will then be shaped liked tubes. Cut tubes into 1/4 inch slices.

Serves 6.

In a deep pan, heat 2-3 inches of oil to 375 degrees.

Sift flour, baking powder, and salt together. Whisk in beer. With a fork, dip slices of squid into batter and drop in oil. Fry until golden brown. Serve at once with lemon wedges.

Marinara Sauce

Ingredients:
1 tablespoon olive oil
2 cloves garlic, minced
1/2 a small onion, chopped
pinch crushed red pepper
1 cup canned crushed tomatoes
salt, pepper

Heat a small sauce pan over medium heat. Add olive oil. When hot, add garlic and onion. Saute for 1 minute. Add crushed red pepper. Saute for 1 more minute. Add crushed tomatoes and bring to a boil. Remove from heat and season with salt and pepper to taste.

Aioli Sauce

Ingredients:
1 egg yolk
1 tablespoon dijon mustard
1/2 teaspoon salt
1/2 teaspoon red wine vinegar
1/2 cup vegetable oil mixed with 2 tablespoons olive oil
1 clove garlic, minced
1 tablespoon lemon juice

Combine egg yolk, mustard, salt, and vinegar in a bowl or blender. Whisk or blend for 10-20 seconds. Begin adding oil drop by drop while whisking or blending until emulsified. Add the rest of oil in a steady stream. Once the mayonnaise is formed, add garlic and lemon juice.

Yum

Red Velvet Chocolate Souffle with Cream Cheese Icing Sauce

Red Velvet Chocolate Souffle with Cream Cheese Icing | impeckableeats.com

Red Velvet Chocolate Souffle with Cream Cheese Icing Sauce
So this is not a Paula Peck original recipe. In fact, although souffles are French and much of her work with James Beard was based on French recipes, I haven’t been able to find record of her making a souffle. When I asked my father about this, he had no recollection of her making one at all. It’s possible that somewhere between the issues of making sure that a souffle rises and the fact that it collapses within minutes after coming out of the oven, she found them to be too high maintenance for her minimalist approach to baking.

The thought of making a souffle often terrifies people. Before I went to culinary school, I tried making one a couple of times and failed miserably. I remember my nervousness the day we tackled the unit on souffles. We had to make 3 basic souffles: chocolate, fruit based, and cheese. My fear, of course, was that my souffles wouldn’t rise. The techniques and recipes turned out so solid that not only did all three rise, I don’t recall anyone in the class struggling with that unit at all. Unless I’m changing a recipe or testing one, I can usually turn out a technically correct souffle without a problem by sticking with the following tips:

– Do not over beat egg whites.
– Do let egg whites stand very long (they will deflate).
– Use a souffle mold with straight sides.
– Coat the molds with butter but also either sugar, Parmesan, or bread crumbs. I believe this helps the souffle grip the sides and rise.
– Most souffles should be baked in an oven at 375 to 400 degrees (if heat is too low, the souffle will flatten and spill out of dish. If too high, center will be liquid and top will be crusty)

Red Velvet Chocolate Souffle with Cream Cheese Icing | impeckableeats.com

Since souffles are somewhat old fashioned, I wanted to make one with a modern twist. With the popularity of red velvet cake and my love of cream cheese frosting, I took on this what’s old is new challenge. The resulting decadent warm red velvet chocolate souffle with a touch of sweet fruity Grand Marnier and tart cream cheese icing sauce definitely fits the bill.

Red Velvet Chocolate Souffle with Cream Cheese Icing Sauce

Ingredients

1 tablespoon flour
1 tablespoon unsalted butter
½ cup milk
3.75 oz of bittersweet chocolate (63%-73%), finely chopped
2 egg yolks
1 teaspoon Grand Marnier
1 teaspoon vanilla extract
1 teaspoon red food coloring (amount may depend on brand used)
4 egg whites
Pinch salt
1 ½ tablespoons granulated sugar
Butter and sugar for coating molds
 
Cream Cheese Icing Sauce
3 oz cream cheese
2 tablespoons powdered sugar
2 tablespoon unsalted softened butter
2 tablespoons milk
½ teaspoon vanilla extract

Instructions

Preheat oven to 400 degrees. Coat four 8oz soufflé molds with butter and sugar. Refrigerate molds.

Mix flour into softened butter. Bring milk to a boil. Thicken milk with butter flour mixture and cook for 2-3 minutes until thick. Remove from heat and add chocolate. When chocolate is melted, add egg yolks, one at a time, beating well after each addition. Beat in Grand Marnier and Vanilla. Add food coloring and mix (add enough food coloring for a deep red color).

Whip the egg whites with pinch of salt. Gradually add sugar a little at a time. Whip until egg whites are stiff. Fold a quarter of the egg whites into chocolate base to lighten. Fold in remaining whites. Spoon or pour mixture into prepared molds, leaving a ¼ to the rim. Reduce oven temperature to 375 degrees and place molds in middle of the oven. Bake 10-15 minutes until puffed.

Serve immediately with Cream Cheese Icing Sauce:

Heat butter and cream cheese in microwave for 20 seconds (or briefly heat in saucepan over low heat ). Whisk in sugar and vanilla. Whisk in milk 1 tablespoon at a time. Serve warm. Makes ¾ cup

Serves 4.

red velvet chocolate souffle

Yum

1 28 29 30 31 32 33