Crunchy Homemade Pickles

Crunchy Homemade Pickles

Homemade Pickles

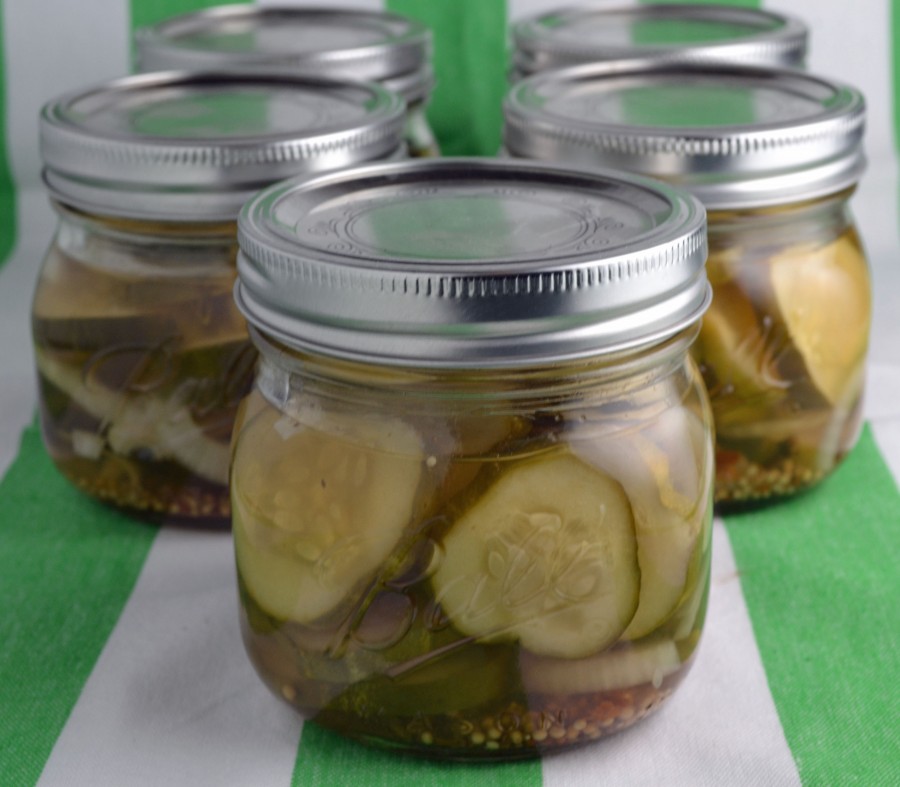
It’s been a little while since I’ve posted. Returning from my summer hiatus, it may seem strange that I selected a pickle recipe – but I absolutely love pickles. And apparently, I’m not the only one. They seem to be growing in popularity and I continue to see more and more specialty pickles at regular grocery stores. The basic dill and bread n butter pickles still remain the staples but now there are garlic dill, horseradish dill, spicy dill, half sour, and sour, just to name a few. There are also different and trendy, often hipster like brands that specialize in..well…specialty pickles. They are delicious but usually expensive, often charging $8-$9 for a small jar. This is why making homemade pickles seems so well worth it. Not only can you add and adjust the spices to your liking, but with just a few ingredients, you can make enough pickles for a year, at less than half the price.

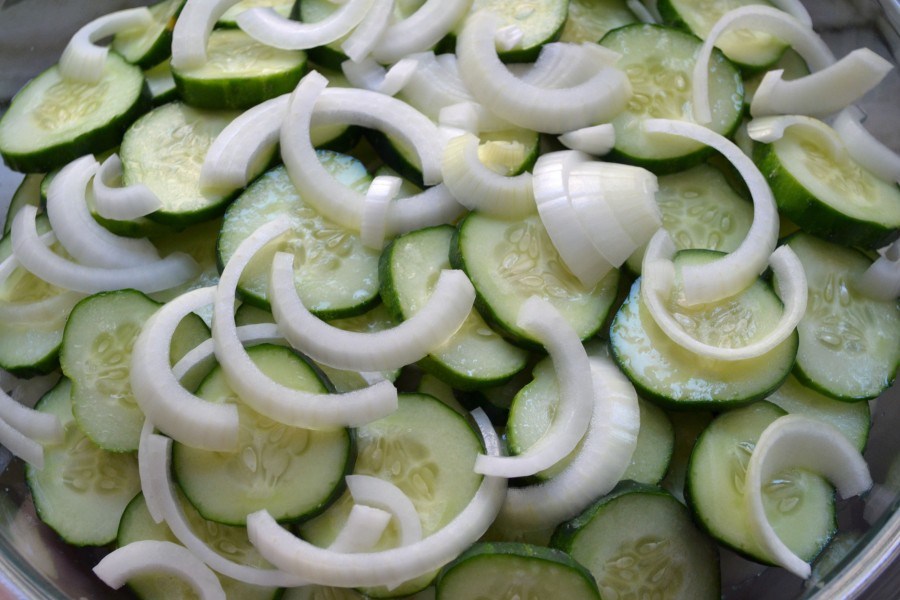
I made quite a few modifications to this recipe, originally from “The Art of Good Cooking.” Most notably, I eliminated the whole cup of olive oil my grandmother instructed to use. I find that vinegar and water works perfectly fine and is both healthier and less expensive. I also added sprigs of dill and adjusted some of the spices. The actual process of making the pickles is very basic and despite what some may believe, no special canning equipment is needed. Just a big pot and canning jars are sufficient. The most important part of the process is salting and chilling the sliced cucumbers and onions. This seems to help ensure a crunchy pickle, which in my opinion, is the key to a good pickle. I’m not a fan of the soft ones, with little or no resistance when you bite into them. The crunchier, the better. A crisp crunchy pickle is a reminder of the fresh cucumber it was made from. That tasty tang from the brine and vinegar makes it the perfect add on to any end of summer barbecue dish – especially hamburgers!

Ingredients:

12 large kirby cucumbers (about 4 lbs)
1/2 cup coarse salt
4 onions, thinly sliced
whole garlic cloves (as many as you have jars)
fresh sprigs of dill (as many as you have jars)
bay leaves (as many as you have jars)
2 quarts cider vinegar
1 quart of water
1/4 cup sugar
2 tablespoons yellow mustard seeds
2 tablespoons black mustard seeds
2 tablespoons pickling spices
2 tablespoons celery seeds
4 quart jars or 8 pint jars, sterilized (see note)

In a large bowl, make alternate layers of sliced cucumbers, salt, and sliced onions. Let stand in refrigerator 5 hours. Rinse in ice water and drain well, pressing out as much liquid as possible. Return vegetables to bowl. Place a clove of garlic, a sprig of dill, and a bay leaf in each jar. Pack jars with vegetables.

Pour cider vinegar and water into a pot. Add sugar, mustard seeds, pickling spices, and celery seeds. Bring to a rolling boil. Pour mixture into each jar to cover vegetables. Cover tightly. Store in the refrigerator for two weeks or to make pickles shelf stable, place jars in a canner or pot of boiling water for 5-10 minutes or until the lid does not move up or down when pressed in the center.

Note: To sterilize jars and lids, simply boil them in a large pot of water for 5 minutes.

Adapted from “The Art of Good Cooking,” by Paula Peck.

Cucumbers and Onion for Pickles


Yum

Smoked Salmon in Sour Cream-Horseradish Sauce

Smoked Salmon in Sour Cream-Horseradish Sauce

Smoked Salmon Spread

Growing up in Minnesota, I wasn’t particularly familiar with smoked salmon or its popularity. My limited experience consisted of the bagels and Nova lox my father made a point to bring home every time we visited NYC. It was considered a treat when we had it (though I may have been more into the bagel and cream cheese at that time than the salmon). I had no idea that there were different kinds of smoked salmon and that it could be bought by the pound and on sandwiches at almost every New York deli.

The quality of smoked salmon varies – usually depending on price but also on the smoking method and/or curing method. Lower quality smoked salmon is usually saltier and somewhat mushier. I like Nova lox, which is technically a cold smoked salmon, but regular lox (which is just cured and not smoked), Scottish, or Norwegian smoked Salmon are also good depending on your preference. Whether you’re eating it on a sandwich or making a spread such as this, it’s important to use a smoked salmon you really like. Unlike most salmon spreads, the actual salmon flavor (and not just the saltiness) can be tasted in this dip-like spread. The horseradish, scallion, and dill complement the salmon and provide a freshness. No cooking, no fuss. Add a few slices of cucumbers for a refreshing crunch and this Smoked Salmon in Sour Cream-Horseradish Sauce is the perfect light lunch or appetizer on a hot summer day.

Ingredients:

1/2 lb smoked salmon, shredded
1/2 cup finely chopped scallions
2 teaspoons fresh dill, chopped
3/4 cup sour cream
2 tablespoons horseradish
1 tablespoon mayonnaise
salt and pepper
1 teaspoon lemon juice (optional)
1 cucumber, thinly sliced (optional)

Add scallions and dill to smoked salmon.

In a separate bowl, combine sour cream, horseradish, and mayonnaise. Season with salt and pepper.

Add dressing to salmon mixture. Toss gently. Serve on thinly sliced rye or pumpernickel bread or multi-grain crackers layered with cucumbers (if using).

Adapted from “The Art of Good Cooking,” by Paula Peck.

Smoked Salmon Spread 2

Yum

Strawberry Shortcake

Strawberry Shortcake

Strawberry Shortcake

It’s berry season here in the Northeast and the first local strawberries have arrived. Smaller and juicier than the California variety that are available year round, these berries are delicious on their own but even tastier in the all-American classic, Strawberry Shortcake. Until now, my limited experience with strawberry shortcake consisted of pound cake (also excellent) and not the traditional shortcake, a sweetened biscuit that acts as the vehicle for the berries and cream. It’s clear that the density and texture of real shortcake changes this dessert entirely, creating a rich and substantial end to any meal.

This is another “friends of Paula Peck” recipe. It is adapted from a Blueberry Shortcake recipe in “John Clancy’s Favorite Recipes,” by John Clancy as well as “The James Beard Cookbook,” by James Beard. As mentioned in other posts, John Clancy was a friend and colleague of my grandmother and also a restaurant owner and chef instructor. James beard was of course…James Beard, amazing chef and mentor to my grandmother (amongst other famous chef such as Julia Child). The main difference between the two shortcake recipes is the use of vegetable shortening in the James Beard recipe. Though it provides a flakier pastry, I don’t usually keep shortening around and prefer to use butter. Both recipes contain instructions for one large shortcake to be eaten in slices like regular cake. I prefer individual shortcakes – making more of a personalized presentation and allowing you to put together just a few cakes at a time and save some for the next day. The last adaptation I made is the addition of vanilla extract to the macerated strawberries. While adding sugar to the strawberries, a touch of vanilla goes a long way and makes them even more fragrant and sweet. How can you go wrong with strawberries, cake, and cream?

Ingredients:

Strawberries
1 lb strawberries, hulled
2 tablespoons granulated sugar
1/2 teaspoon vanilla extract

Shortcake
3 cups all-purpose flour
3 1/2 teaspoons double-acting baking powder
1 1/2 teaspoons salt
4 tablespooons granulated sugar
8 tablespoons unsalted butter, cut into small pieces
1 1/4 cups heavy cream
1 tablespoon softened butter
cinnamon sugar (optional)

Whipped Cream
1/2 cup heavy cream, whipped with 1-2 tablespoons sugar and 1/2 teaspoon vanilla

Slice strawberries and mix with both sugar and vanilla extract. Refrigerate for 15-30 minutes.

Preheat oven to 400 degrees. Grease or cover a large baking sheet with parchment paper. Sift the flour, baking powder, salt, and sugar into a large bowl. Add the butter and with your fingers rub the ingredients together until they turn into coarse, separate pieces. Stir in the heavy cream with a wooden spoon and mix until a soft dough is formed.

Turn dough out onto a lightly floured board and knead it just 1 minute. Divide the dough, making 4 portions. Divide the 4 portions, making one of each of the portions a little larger than the other. Roll the larger portions into rounds 1/2 inch thick and place them on a cookie sheet. Spread the 1 tablespoon of softened butter on top. Roll the second piece of dough into rounds a little less than 1/2 inch thick and roll sides and top in cinnamon sugar (if using). Place them on top of the larger pieces. Bake on the middle shelf of the preheated oven for 20 minutes or until firm.

Remove the top layers of the cakes and spread strawberries on the bottom layer. Dollop whip cream on top and replace top layer. Add more whipped cream and strawberries on top layer.

Serves 4.

Yum

Asparagus au Gratin

Asparagus Gratin | impeckableeats.com


Asparagus au Gratin

As asparagus floods the farmers markets, Spring is quickly turning into summer. This seasonal vegetable along with arugula, are often a few of the first signs of warmer weather yet to come. Now, with the abundance of fresh summer produce within reach, it’s time to end Asparagus season with a bang. Asparagus au Gratin is a rich decadent dish that sounds a little fancier than it really is. Think cheesy asparagus…or better yet: Mac & Cheese (minus the Mac).

It may seem like a shame to take a healthy vegetable like asparagus and make it somewhat unhealthy. Many French dishes have a knack for doing this but once you taste them, you forget why you were ever concerned in the first place. This is one of those dishes. Another delightful recipe adapted from “The New York Times Cookbook” by my grandmother’s friend and dear colleague, Craig Claiborne. Cheddar and Parmesan cheeses are added to a simple béchamel style sauce and then layered with barely cooked fresh green asparagus spears. A quick browning in the oven blends the two together and gives this dish the final touch. Perfect as a side dish for grilled meat, chicken, or even fish – this gratin is a crowd pleaser. And don’t worry, your beach body diet can wait an extra day…

Asparagus au Gratin

Asparagus au Gratin

Ingredients

1/4 cup unsalted butter
1/4 cup all purpose flour
1 3/4 cups chicken broth
1/4 cup light cream
3/4 cup grated Cheddar cheese
1/2 cup Parmesan cheese
salt and pepper
36 asparagus spears

Instructions

Cook asparagus in a large pot of boiling, salted water until just barely tender. Strain and set aside.

In a saucepan, melt the butter, add the flour and stir with a wire whisk until well blended. Meanwhile bring the chicken broth and cream to a boil and add all at once to a butter-flour mixture, stirring vigorously with the whisk until the sauce is thickened and smooth. Add the cheeses, salt and pepper, and stir until cheeses melt.

Place alternate layers of sauce and asparagus in a buttered casserole, ending with a layer of sauce. Sprinkle with additional Parmesan cheese and brown quickly under a preheated boiler or bake in preheated oven at 450 degrees for 5 minutes.

Adapted from “The New York Times Cookbook,” by Craig Claiborne.

Yum

Grilled Swordfish Skewers

Grilled Swordfish Skewers

Grilled Swordfish Skewers

After what seemed like a never-ending cold snowy winter in the Northeast, grilling season is finally here. Lucky for us, “The Art of Good Cooking” by my grandmother, Paula Peck, has many barbecue recipes I have yet to share. Similar to this Grilled Swordfish recipe, most are in the form of skewers – one of my favorite ways to grill. There is nothing revolutionary about this grilled skewer recipe but it’s simple and delicious. The marinade, which consists of garlic, olive oil, soy sauce, lemon, salt, and pepper, is just light enough to bring out the fresh clean taste of not only swordfish, but any seafood (check out the shrimp shown in this photo). With its meaty firm texture, swordfish is one of the few fish that can actually hold up to being cut into chunks, skewered, and grilled. Like all fish, it’s important not to overcook it – no one enjoys chunks of rubber.

Grilling can be challenge here in NYC. For the authentic grilling experience, the only options are the park or the roof deck or backyard of a wealthy friend. I usually end up doing most of my grilling out of town on vacation. However, the limited grilling options in NYC never stopped my grandmother. Although all of her grilling recipes can be converted to the oven or broiler, she grilled right in her Harlem kitchen. She would set up the grill plate on the stove and fan the smoke out the window, as best she could. The neighbors definitely didn’t appreciate this and I doubt she could get away it now. An actual grill (particularly charcoal) will produce a more flavorful result. But by marinating the fish for 2-3 hours and following the proper cooking times, juicy garlicky swordfish will become a favorite whether broiled, baked, or grilled. Don’t forget the grilled vegetables and fruit– my favorites are bell peppers, grape tomatoes, eggplant, and pineapple!

Ingredients:

2 lbs swordfish steak
3 cloves garlic, finely minced
1/4 cup olive oil
3 tablespoons lemon juice
1 tablespoon soy sauce
salt and pepper

Lemon Parsley Sauce (for serving)
6 tablespoons lemon juice
6 tablespoons olive oil
1/2 cup chopped parsley

Dry fish well on paper towels. Cut into 1 1/2 inch chunks.
Combine garlic, olive oil, lemon juice, and soy sauce. Place swordfish in a bowl and pour mixture over the chunks. Marinate in the refrigerator for at least 3 hours, turning occasionally.

Thread chunks on skewers. Broil, preferably over charcoal, turning occasionally, until swordfish is lightly brown all over. Season with salt in pepper.

Mix together sauce ingredients and spoon over skewered swordfish.

Serves 4-5.

Adapted from “The Art of Good Cooking,” by Paula Peck.

Yum

1 12 13 14 15 16 34